Learn to activate your iphone xs esim in 2026. Our guide covers setup, managing dual SIM for travel, and troubleshooting common issues to avoid roaming fees.
You're probably here because you have an iPhone XS, a trip coming up, and zero interest in paying roaming rates just to open maps, book a ride, or answer a work message after landing. That's exactly where the iPhone XS still earns its keep. It may be an older phone, but it can handle a travel eSIM if the device is ready for it.
The catch is that “iPhone XS supports eSIM” and “your specific iPhone XS will activate a travel eSIM without drama” are not the same thing. Carrier locks, missing EID details, and line settings trip people up far more often than the install itself. Once those are sorted, the phone does what most travelers need: keep a home number available while a second line handles travel data.
Is Your iPhone XS Truly eSIM-Compatible?
You do not want to learn this at the airport. With the iPhone XS, eSIM support depends on the actual device in your hand and whether the carrier has left that feature available, not just the fact that the phone says iPhone XS.
Check the device, not just the model name
Start with the two checks that matter on this older iPhone. First, dial \*#06# and look for an EID. Second, open Settings > Cellular and see whether “Add eSIM” or “Add Cellular Plan” appears. If either is missing, stop before you buy a travel plan.
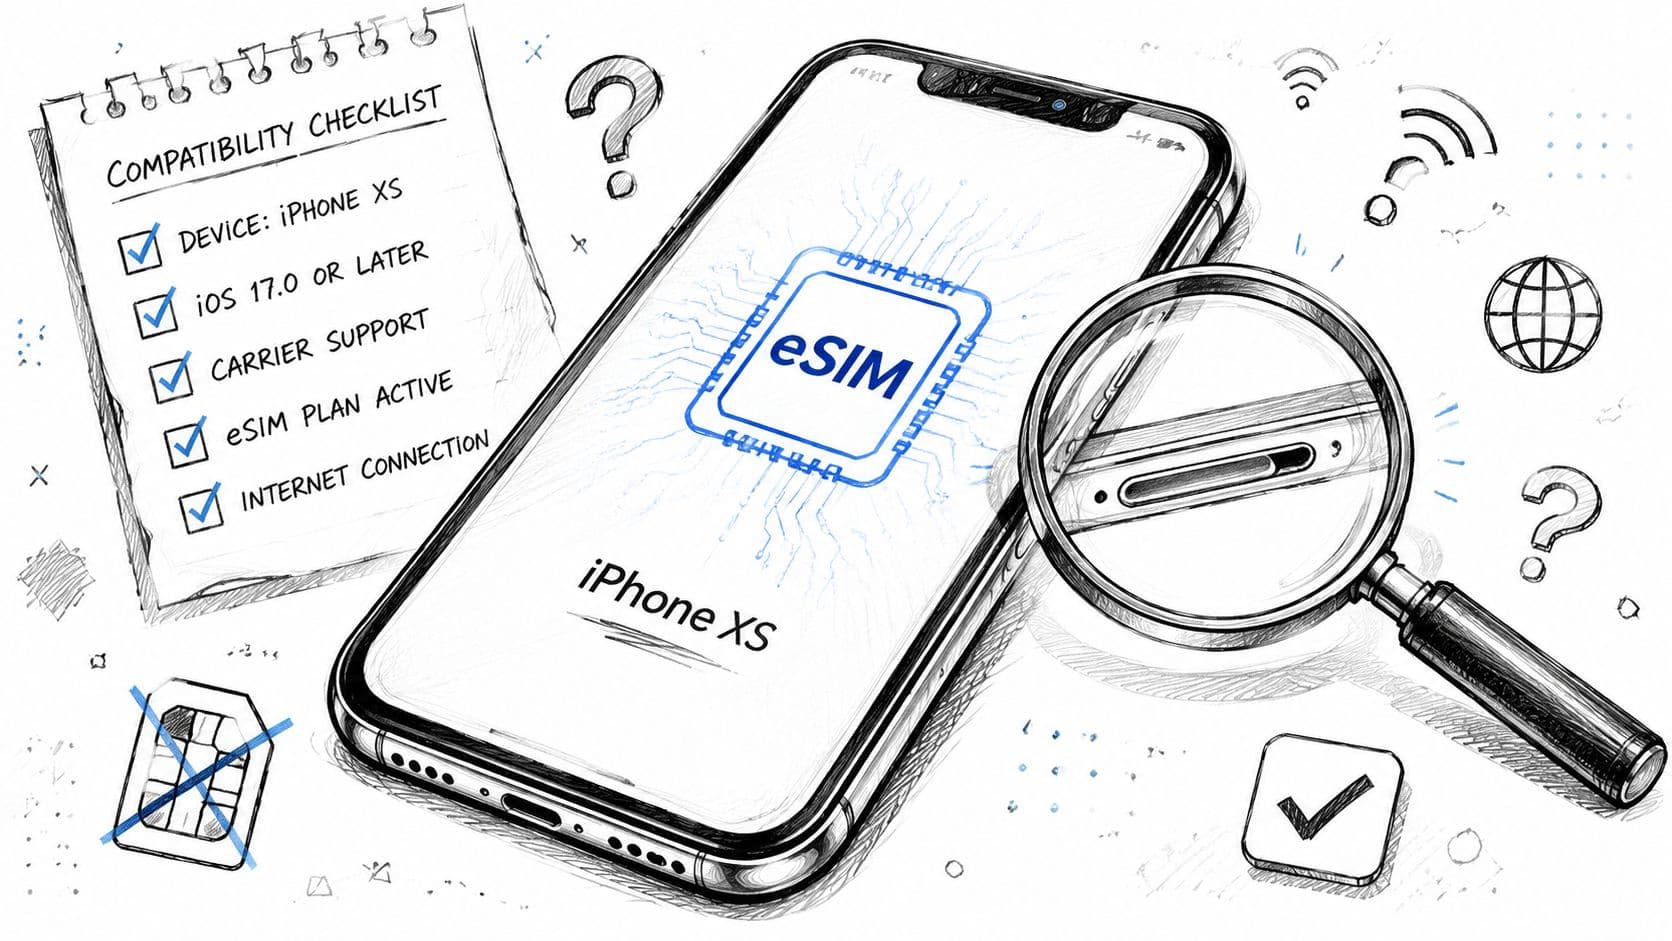
The iPhone XS sits in an awkward middle ground. It supports eSIM, but it does not behave like newer iPhones that make line switching feel more flexible. In practice, that usually means one physical nano-SIM for your home number and one eSIM for travel data. For trips abroad, that setup is often enough. For anyone expecting newer dual-eSIM behavior, it can be a surprise.
Practical rule: No EID or no “Add eSIM” option means no purchase yet.
If you want to confirm before paying for a plan, use the RoamFly phone compatibility checker for eSIM-supported devices. It is a quick way to avoid buying a travel eSIM you cannot install on an older handset.
The lock status problem
Carrier lock is the part that catches people. I see it most often with used iPhone XS units bought from marketplaces or handed down by family. The phone looks fine, the physical SIM works, and the owner assumes eSIM will work too. Then the travel plan refuses to activate.
Run through this in order:
- Check that EID appears in \*#06# or Settings.
- Check carrier lock status if the phone came from a contract carrier or a reseller.
- Check that Add eSIM or Add Cellular Plan is visible in Cellular settings.
- Buy the travel eSIM only after those checks pass.
That order saves time and money. On an iPhone XS, small assumptions turn into wasted setup time fast, especially when you are trying to get a RoamFly travel eSIM working after landing instead of before departure.
How to Activate Your eSIM on iPhone XS
You do not want to be doing this for the first time after landing, standing in airport Wi-Fi that drops every few minutes. On the iPhone XS, eSIM setup is usually straightforward if you use the QR code method and do the prep in the right order. That matters more on this older model, because when activation fails, troubleshooting is slower than it is on newer iPhones.
The usual travel flow is simple. Buy the eSIM, open the QR code on a second screen, connect the iPhone XS to stable Wi-Fi, then add the plan from Cellular settings. For a travel eSIM such as RoamFly, that is still the setup path I recommend first because it is the easiest to verify step by step.
The QR code path most travelers should use
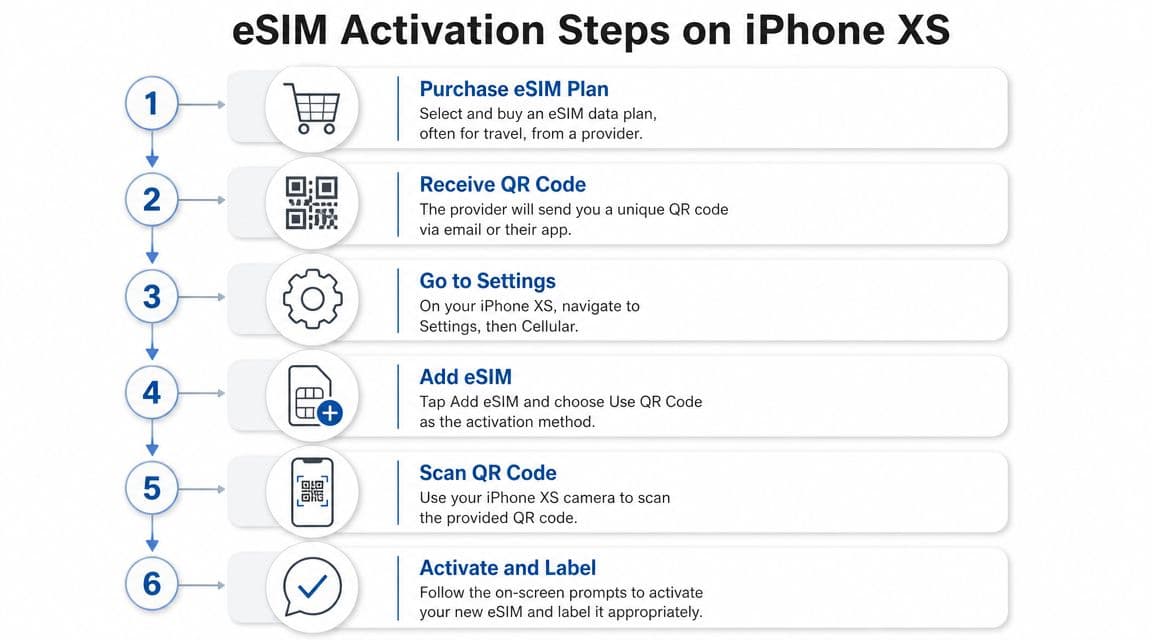
Use this order:
- Buy the plan on another device if possible. Scanning is easier when the QR code is on a laptop, tablet, or a second phone.
- Connect your iPhone XS to Wi-Fi. Do not rely on weak hotel data or a half-working home SIM during setup.
- Open Settings > Cellular.
- Tap Add eSIM or Add Cellular Plan.
- Scan the QR code from your provider.
- Finish the prompts and give the line a clear label right away.
If you want screenshots that match the process, RoamFly's iPhone eSIM setup guide is a useful reference.
The iPhone XS can store more than one eSIM profile, but it is still an older dual-line setup in daily use. For travel, that usually means keeping your regular nano-SIM in place and turning on one eSIM for data. That setup works well. It just helps to know the XS is less flexible than newer iPhones before you start adding plans for multiple countries.
A visual walkthrough helps if you have never added a second line on an iPhone before.
If the QR code does not scan
This happens more often than people expect. Usually the issue is not the eSIM plan itself. It is one of a few setup snags on the phone.
Try these fixes first:
- Increase screen brightness on the device showing the QR code.
- Move the phone back slightly. The XS camera can struggle if you hold it too close.
- Clean the camera lens.
- Copy the activation details manually if your provider includes an SM-DP+ address and activation code.
- Restart the iPhone XS and try again on Wi-Fi.
Carrier apps are another activation option, especially for domestic service, but they are less consistent for travel plans. On an iPhone XS, I usually stick with QR setup unless the provider only supports in-app activation. It gives you fewer moving parts and makes it easier to tell whether iOS accepted the plan.
One habit saves headaches abroad. Add the line first, label it clearly, and only then decide which line handles data. That order prevents the common mistake of activating a travel eSIM correctly but leaving the home SIM as the active data line.
Managing Your Physical SIM and eSIM Together
Adding the eSIM is the easy part. The useful part is deciding what each line should do. The iPhone XS is a dual-line phone, but it only feels simple once the lines are clearly separated in your settings.
AT&T's iPhone XS guide shows that users can add an eSIM, label plans, and switch lines separately for calls and messages from the Phone and Messages apps. Apple also allows travelers to keep the home line active for iMessage and FaceTime while a travel eSIM is turned on, as summarized in AT&T's iPhone XS dual-SIM support guide. That's the part most quick-start guides skip.
Label the lines before you do anything else
Don't leave the lines named “Primary” and “Secondary” unless you're sure you'll remember which is which under stress. Rename them to something obvious:
- Home
- Travel Data
- Work
- Personal
This matters when the phone asks which line should place a call, send a message, or carry cellular data. Vague labels cause real mistakes, especially when you're trying to approve a bank login code in an airport queue.
A setup that works well for most travelers looks like this:
- Physical SIM: Keep your regular number.
- eSIM: Use it for travel data.
- Default voice line: Usually your home number.
- Cellular data line: The travel eSIM.
Set roles for data, calls, and messages
The iPhone XS gives you enough control to avoid most roaming traps if you set the roles carefully.
Use the travel eSIM for cellular data. That's the core money-saving move. Then decide whether your home line needs to stay on for incoming texts, especially one-time codes from banks, work systems, or messaging apps tied to your regular number.
If you need that home number alive, keep it active but pay attention to how your carrier handles roaming. The phone can manage two lines. Your bill depends on your carrier's rules, not just Apple's settings.
A lot of travel friction comes from confusing active line with data line. They aren't the same thing on an iPhone XS.
For iMessage and FaceTime, many travelers want continuity more than anything else. If your home number is the identity your contacts already know, preserving that line can prevent awkward message thread splits.
Assigning Roles to Your SIMs for Travel
| Task | Recommended SIM | Reason |
|---|---|---|
| Mobile data abroad | Travel eSIM | Keeps maps, email, rideshare, and browsing off your home carrier's roaming rates |
| Regular incoming SMS | Physical home SIM | Helps you keep access to banking codes and account verification tied to your main number |
| Outgoing calls to home contacts | Depends on your plan setup | Choose the line that won't trigger avoidable roaming charges |
| iMessage and FaceTime identity | Usually physical home SIM | Preserves the number or account your contacts already use |
| Hotspot for laptop use | Travel eSIM if supported by the plan | Keeps work traffic on the travel line instead of your domestic carrier |
| Temporary local data use | Travel eSIM | Avoids SIM swapping and keeps your main card in the phone |
If you only remember one thing, remember this: choose the data line on purpose. Many “my eSIM doesn't work” complaints come from a perfectly installed plan that was never set as the active data line.
Using Your iPhone XS eSIM for International Travel
The most practical use of an iPhone XS eSIM is avoiding roaming on short trips, long work travel, and multi-country itineraries. The phone is old, but the travel workflow still holds up if you prepare before departure.
Apple notes that the iPhone XS can use eSIM while traveling internationally, but only with carriers or worldwide service providers that support eSIM. Setup may also depend on Wi-Fi, a carrier-independent device, and in some cases local ID checks, which Apple highlights in its support guidance for using Dual SIM while traveling. That gap between capability and actual readiness catches people all the time.
Install before departure
The cleanest move is to buy and install the travel eSIM while you still have reliable home internet and time to fix anything odd. If you wait until after landing, every small issue feels bigger because you may be standing in immigration, outside a station, or trying to message your hotel.
For travelers comparing options, RoamFly's travel eSIM articles and destination guidance are one example of the kind of planning material worth reading before a trip. The value is less about hype and more about choosing the right country, regional, or broader coverage format before you fly.
A regional plan often makes more sense than stacking country-specific installs if your route includes multiple stops. It reduces the chances of line confusion and cuts down on reconfiguration during the trip.
Where travel plans help and where they don't
A travel eSIM is excellent for data. It's not automatically a full replacement for your home identity. That's the most important mindset shift with the iPhone XS.
If you need your regular number for work calls, bank texts, or app verification, keep thinking in terms of two lines with different jobs:
- Home SIM for identity
- Travel eSIM for connectivity
That's why the iPhone XS still works well for international trips. It doesn't need to be the newest iPhone. It just needs to be carrier-independent, correctly configured, and tested before takeoff.
Troubleshooting Common iPhone XS eSIM Issues
The iPhone XS was the first iPhone generation to support eSIM, and Apple's guidance confirms eSIM availability on iPhone XS, iPhone XS Max, iPhone XR, and later models. On the XS, the practical setup is one physical nano-SIM plus one embedded eSIM, which is why it works well for keeping a home line while adding travel data, as reflected in Apple community guidance discussing supported iPhone models.
That means most failures aren't about whether the phone supports eSIM. They're about install conditions or line settings.
QR code won't scan or won't install
Likely causes:
- The QR code is displayed too small
- The phone isn't on Wi-Fi
- The plan was already attempted on another device
- The carrier profile is invalid for that locked handset
Try this:
- Open the QR code on a larger screen
- Increase screen brightness on the device showing the code
- Make sure the iPhone XS is connected to Wi-Fi
- Restart the iPhone, then scan again
- Ask the provider whether the profile can only be installed once
eSIM installed but no service
Likely causes:
- The line is added but turned off
- The phone hasn't re-registered on the network yet
- Data is still assigned to the physical SIM
- The plan activates only in the destination country
Try this:
- Open Cellular and confirm the new line is turned on
- Toggle Airplane Mode, then wait
- Check whether the travel line is selected for cellular data
- Reboot once after installation if the phone seems stuck
If the eSIM appears in settings, the installation may have succeeded. The remaining problem is often line assignment, not the eSIM itself.
You can't switch data to the eSIM
This usually comes down to one of three things: the line wasn't labeled clearly, the eSIM isn't fully enabled, or the physical SIM is still set as the default for data.
Use this checklist:
- Open Cellular Data: Make sure the travel line is selected.
- Check line status: Verify the eSIM line is turned on.
- Review labels: Rename both lines if you can't instantly tell which is which.
- Restart once: iPhone XS devices sometimes need a fresh network registration after changes.
If nothing changes, go back to basics. Confirm the phone is not carrier-locked, the eSIM line is present in settings, and the destination network is supported by the plan you bought.
Embrace a SIM-Free Future with Your iPhone XS
The iPhone XS is old enough to be underestimated and modern enough to stay useful. That's the sweet spot. If the device passes the compatibility checks and you set the line roles correctly, it can still handle the job most travelers care about: keeping your usual number reachable while shifting travel data to an eSIM.
That's what makes the iPhone XS eSIM setup worth learning. You're not squeezing in a novelty feature. You're extending the life of a phone that can still travel well, work well, and save you from the usual SIM-card shuffle.
The people who get the most out of this setup aren't doing anything complicated. They just prepare early, install carefully, and treat the two lines as separate tools.
If you want a straightforward travel setup, RoamFly sells eSIM data plans you can install on a compatible iPhone XS before you leave, so you can keep your home SIM in place and handle travel data digitally instead of hunting for a local SIM after landing.